
Ansible test lab in under 30 minutes
I speak to a lot of people at a lot of user groups, Meetups (like the Melbourne PowerShell Meetup) or conferences and a lot of them seem to not have heard of Ansible yet. To be fair, Ansible is still very new to the Microsoft ecosystem and Microsoft is still quite new to the whole Configuration Management thing.
These people are instantly interested in what Ansible can do and usually ask me “so, how do I start?”
This obviously always depends on what type of person you are and how you learn. I for example need to actually use technology, otherwise I won’t understand it properly. Just reading about it doesn’t cut it for me.
This article will show you how to stand up an Ansible test lab in under 30 minutes.
I have already written about what Ansible is, so if you haven’t seen that article, find it here: Ansible - Windows Configuration Management from Linux
You will also find a link to Trond Hindenes’s website where he explains how to get started with Ansible.
Vagrant
Trond’s article is great to get you started, but it also takes quite a while to get everything setup and installed. This blog is all about automation, so it just makes sense to even automate the deployment of your next Ansible test lab, right?
The main idea about test labs that are mainly used for testing/validating code that you have just written is to spin them up easily and quickly and after having run all your tests you destroy it again.
Vagrant (https://www.vagrantup.com) is perfect for this scenario. Vagrant lets you, with only one line of code on the command line (PowerShell or Mac Terminal) deploy a whole test environment. Vagrant is available for download on Windows and Mac OS and supports all sorts of Hypervisors like Hyper-V, Virtualbox and Docker. There are also plugins available that add support to provision environments on AWS or Azure.
If you’re not sure why to use Vagrant, read this article: https://www.vagrantup.com/docs/why-vagrant/
Vagrant up
The great thing about Vagrant is that you describe your environment in just one file. Granted, it’s a ruby script, so you do need to make sure that syntax is right and maybe read a bit of the (by the way excellent) Vagrant documentation.
Because I am a nice guy I have already prepared a Vagrantfile that includes a Shell script that will install Ansible into the newly provisioned “box”.
Prerequisites
- Internet connection
- Virtualbox installed
- Vagrant installed
- optional: git client installed
Make it so
The following code will clone my Github repository hosting the two needed files to do the installation and then execute the provisioning.
If you don’t have a git client installed on your machine (why wouldn’t you???) then download the sources manually.
git clone https://github.com/davidobrien1985/vagrant_ansible.git
cd vagrant_ansible
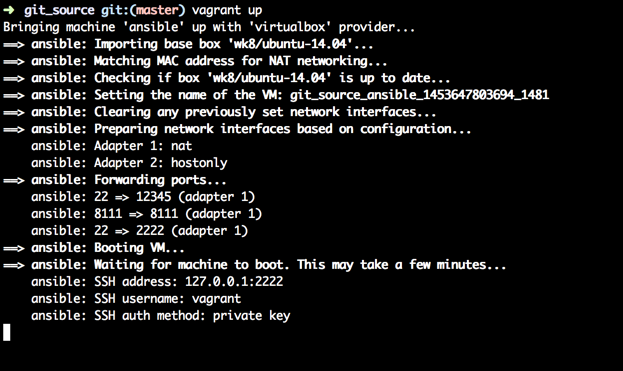
Vagrant up
These four lines will create a new Linux server and will get Ansible and its prereqs installed onto the new server. The whole process will take approx. 10mins, depending on your internet connection.
vagrant ssh ansible will connect you to the new server via SSH (if you have SSH available on your machine or have configured Vagrant to use Putty (Windows)).
We are installing Ansible from source, so we need to run one more command to get Ansible working.
source ansible/hacking/env-setup
Now you can start using Ansible. You will probably want to start adding more machines into your Vagrantfile to make sure that you will actually have an environment to test in. This is really easy. My test environment consists of the Ansible master server, an Ubuntu Ansible node and a Windows Server 2012 R2 Ansible node.
When I’m done I just call the following code and my environment is gone. No worries, because all my config and code is in source control anyways and gets automatically pulled in into each new environment I provision with Vagrant.
vagrant destroy
Enjoy your new toy!
Leave a Comment